VLAN configuration can be a large overhead on resources making sure the right device is in the right VLAN.
Constantly re-configuring switches trying to keep on top of users moving their PCs.
With dynamic VLANs that task can (almost) be a thing of the past.
Steps required;
- Build RADIUS server
- Configure RADIUS server
- Add a RADIUS Client
- Create Connection Request Policy
- Create Network Policy
- Configure switch
- Active Directory configuration
- PC Configuration
- Debugging
1. – BUILD RADIUS SERVER
Check out step 1 of my previous post titled HP Procurve with RADIUS authentication using NPS
2. – BUILD RADIUS SERVER
2.1 – Add a RADIUS Client
Check out step 2 of my previous post titled HP Procurve with RADIUS authentication using NPS
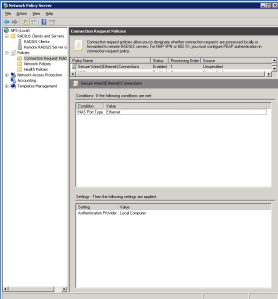
2.2 – Create Connection Request Policy
Open Network Policy application and expand Policies and right click on Connection Request Policies then click ‘New’.
Configure the Connection Request Policy (CRP) as;
Conditions;
- NAS port type = Ethernet
Settings;
- Authentication Provider = Local Computer
2.3 – Create Network Policy
Network Policy (NP) as;
Conditions;
- NAS Port Type = Ethernet
- Windows Groups = Domain\SecurityGroup
- The SecurityGroup is a security group containing the devices for this specific VLAN
- Call it something meaningful eg VLAN64
Settings;
- Extensible Authentication Protocol Configuration = Configured
- Ignore User Dial-in Properties = True
- Access Permission = Grant Access
- Extensible Authentication Protocol Method = Microsoft Protected EAP (PEAP)
- Authentication Method = EAP OR MS-CHAP v2 OR MS-CHAP v2
- NAP Enforcement = Allow full network access
- Framed-Protocol = PPP
- Service-Type = Framed
- Tunnel-Medium-Type = 802
- Tunnel-Pvt-Group-ID = <VLAN-Number>
- Tunnel-Type = Virtual LANs (VLAN)

When need to create other policies for different VLANS, you can duplicate your first CP and change the name, Windows Group & Tunnel-Pvt-Group-ID to match the VLAN you need to use.
3. – Configure Switch
Add the radius server and key you used in step 2
radius-server host <NPS ServerIP> key XXXXXXXXXXXXXXXXXXXXX
aaa authentication port-access eap-radius
Configure which ports will be used
aaa port-access authenticator <PortList>
eg
aaa port-access authenticator A1-A13,A20-A24,C1-C24
Configure the ports that can use the Guest VLAN – this can be the same port list as above
aaa port-access authenticator <PortList> unauth-vid <GuestVLANID>
nb: You can use a guest VLAN for devices that fail the NPS policies, this VLAN can have an access control list or you can have a firewall interface as the gateway for better control.
Acticate the dynamic VLAN configuration
aaa port-access authenticator active
Add the VLANs that will be used
vlan <VLANID>
tag <UplinkPorts>
name “VLAN Name”
exit
Configure a GUEST VLAN
vlan <GuestVLANID>
tag <UplinkPorts>
name “Guest VLAN”
exit
4. – Active Directory configuration
Within the example NP above I added DOMAIN\VLAN64 as the Windows Group, create a security group within Active Directory called VLAN64 and add all the PCs to that group.
When the PCs in that group connect to a configured switch port, the VLAN should be changed as per the Connection Policy Tunnel-Pvt-Group-ID setting.
For none-domain PCs, eg printers, create a user account and set the Display Name as the host name but the username & password must be the MAC address of the device without any colons or dashes eg 11AA22BB33CC44DD and add that account to the VLAN group as with domain PCs.
5. – PC Configuration
Make sure the Wired AutoConfig service is set to Automatic.
Go to the network adapter properties and select the Authentication tab, make sure the following is set;
- Enable IEEE 802.1X authentication is selected
- Microsoft Protected EAP is selected
- On the Additional Settings specify Computer authentication
To be continued…
